Looking back through my blog, I realized that the level of detail has been decreasing. That was just due to lack of time. So, I’ll try to include a bit more color commentary and pictures so people can see exactly what I’m doing.
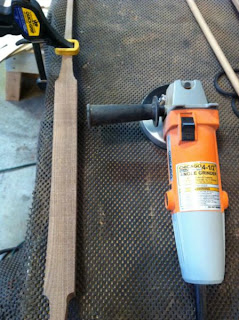
Today I finished the last two spindles. I start out by clamping the spindle to my bench. There is rubber shelf liner underneath to ensure it doesn’t get scratched up. I use my angle grinder with a sanding pad to quickly knock down the corners and begin rounding over the backs.
Then I use my orbital sander to clean it up. I go over the entire piece to eliminate the bandsaw marks.
Notice that the seat end is still very wide. Next, I place the spindle beside one that is already finished, and mark it so they are the same length. I cut off the end to ensure that when the spindles are installed in the seat the shoulders will be at the same height.
I drilled holes into a scrap piece of wood and use that for test fitting the spindles. I mark off the 1/2" end and then cut it using my scroll saw to get the width down to the rough size of the hole.
Then using a microplane and files, I shape the ends until they are round and they fit into the holes to the appropriate depth. The backside of the spindle, at the very bottom, is chamfered. This is to allow for the forward movement that is required when the spindles are mounted in the headrest.
I use the Veritas dowel maker to round the ends once I have them shaped close to the right size. If the ends are not very close to the right size, I found that I get quite a bit of tear out. The dowel makers are adjusted to be slightly big, so when the end is completed using the tool, I still need to sand it to fit properly. Using the 1/2” tool on the seat end just doesn’t work well for me. The reason is that the tool starts hitting the shoulders before the entire end is done. It is helpful to get the very end perfectly round though. Starting from there, I can shape the rest by hand.
Here is a picture with spindles 5 and 6 completed (they are still just taped behind the headrest at this point).
Installing the spindles into the headrest is like solving a puzzle. I had to hold the headrest and at the same time try to fit in the 7 spindles. Since my headrest is designed to be lower in the middle, that’s where I started. I installed the middle (#4) spindle and then worked my way out. It turned out that the headrest was too high. This was by design. I left each spindle a little long so that I could fine tune it later. I believe the easiest way to adjust the spindles is to do them one at a time. I would slip one spindle into the headrest, then check to see how high the headrest was with respect to the back legs. Then I would remove the spindle, cut off a small amount from the top, and check it again. It usually only took a couple of tries to get it right. Since I was contorting myself to see where the headrest holes were, I finally drew some witness marks at each hole to make the alignment easier. Once each spindle was individually adjusted, I installed them all into the headrest. With a single spindle in the headrest, it’s fairly easy to pull the headrest forward to align with the back legs, but with all 7 spindles installed, there is a lot of pressure when pulling everything forward. To avoid breaking any more spindles, I filed the front of the seat holes to provide some relief. Brock uses a reamer to do the same thing. Once that was done, the spindles moved more easily and I was able to get the headrest installed (with no cracking noises!).
I now have a complete chair!! It’s just not a rocking chair yet.
The next step will be to sand, sand, and sand some more. I will have to disassemble the chair, but once thoroughly sanded, it will be ready for glue up. After that big step, I will do the final shaping and sanding of every joint.


No comments:
Post a Comment