Sunday, July 17, 2011

Dirty Little Secret


Happy 4th of July!  
(I forgot to post this after I wrote it.  Hence, the incorrect date.)

I’ve spent most of my weekend in the shop, but that’s fun for me.  The sanding still continues.  I managed to get all of the legs screwed and glued in place.  I also have the arms screwed and glued, so there’s no going back now. 

In the months since I originally cut the parts, the wood has moved.  That means that the joints are no longer tight.  My dirty little secret?  Wood filler.  I know this is a cheat and may be unprofessional for fine furniture, but with gaps in the joints, there was really no other choice. 

I made my own filler by mixing Titebond II glue and walnut dust from my previous sanding.  I use old business cards and a toothpick to mix the filler.  I mix it into a thin paste. 

One thing I learned was to apply the filler sparingly!  Here’s a picture of a joint with filler that is applied much too thick.  This resulted in a lot more sanding.  Since I hate sanding, this was not a wise move.  However, after sanding (for many hours), the joint did come out looking pretty good.  The next step is to complete sanding of the other arm and then move onto the headrest. 


Sunday, June 26, 2011

Sanding, sanding, and more sanding


The good news is that I’m back working on my chair again.  The bad news is that it’s all sanding.  I hate sanding. 

Chuck Brock starts with 24 grit and moves through an entire “schedule” of grits up to 1000, and then he sands some more with three types of 3M pads.  Sorry Chuck, but that is just not going to happen in my shop.  I don’t have the time or the patience.

When I cut the parts, I tried to minimize the saw marks as much as possible, and then I sanded as I went.  At this point, I used 60 grit paper to remove saw and tool marks.  I am also continuing to shape some parts.  I then follow up with 120 grit and then 220 grit.  The object of each pass is to remove the scratch marks from the previous pass.  At the 220 grit level, the wood is already pretty smooth.  I plan to go to 400 grit before finishing and then to use a 3M pad between coats.  I didn’t include any pictures this time because I figured everyone has seen sawdust before.  I made good progress this weekend, but I still need to complete sanding on one back leg and 5 more spindles.

Here are a few things I’ve learned:  Use power tools whenever possible.  I use my random orbital sander as much as possible, but there are just some areas that must be sanded by hand.  After using the ROS, go over the piece by hand and sand with the grain.  Don’t be afraid to back up to a lower grit if the scratches are not coming out.  Use sanding blocks or dowels whenever possible to save wear and tear on your hands.  Use a soft cloth to clean the dust from the wood and use your hands to feel the wood.  Your hands can often feel imperfections that cannot be seen.  Finally, don’t give up.  Sanding is a horrible task, but keep at it until the wood looks and feels perfect.  Don’t settle for good enough.

I’m looking forward to the long 4th of July weekend.  I hope to finish sanding the individual pieces, and then assemble the chair again, and complete the joint sanding.

Thursday, June 2, 2011

Delay

Sorry for the delay, but life sometimes gets in the way.  My chair is still waiting for me to sand it, but a job change and a death in the family has set me back a few weeks.  Please stay tuned.  More blog posts coming soon.

Sunday, April 17, 2011

Spindle Completion

Looking back through my blog, I realized that the level of detail has been decreasing.  That was just due to lack of time.  So, I’ll try to include a bit more color commentary and pictures so people can see exactly what I’m doing.

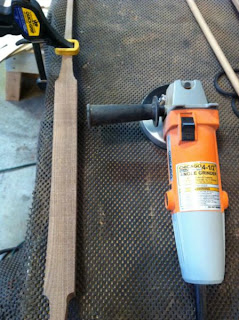
Today I finished the last two spindles.  I start out by clamping the spindle to my bench.  There is rubber shelf liner underneath to ensure it doesn’t get scratched up.  I use my angle grinder with a sanding pad to quickly knock down the corners and begin rounding over the backs.  


Then I use my orbital sander to clean it up.  I go over the entire piece to eliminate the bandsaw marks.


Notice that the seat end is still very wide.  Next, I place the spindle beside one that is already finished, and mark it so they are the same length.  I cut off the end to ensure that when the spindles are installed in the seat the shoulders will be at the same height. 


I drilled holes into a scrap piece of wood and use that for test fitting the spindles.  I mark off the 1/2" end and then cut it using my scroll saw to get the width down to the rough size of the hole. 


Then using a microplane and files, I shape the ends until they are round and they fit into the holes to the appropriate depth.  The backside of the spindle, at the very bottom, is chamfered.  This is to allow for the forward movement that is required when the spindles are mounted in the headrest.

 I use the Veritas dowel maker to round the ends once I have them shaped close to the right size.  If the ends are not very close to the right size, I found that I get quite a bit of tear out.  The dowel makers are adjusted to be slightly big, so when the end is completed using the tool, I still need to sand it to fit properly.  Using the 1/2” tool on the seat end just doesn’t work well for me.  The reason is that the tool starts hitting the shoulders before the entire end is done.  It is helpful to get the very end perfectly round though.  Starting from there, I can shape the rest by hand.

Here is a picture with spindles 5 and 6 completed (they are still just taped behind the headrest at this point).

Installing the spindles into the headrest is like solving a puzzle.  I had to hold the headrest and at the same time try to fit in the 7 spindles.  Since my headrest is designed to be lower in the middle, that’s where I started.  I installed the middle (#4) spindle and then worked my way out.  It turned out that the headrest was too high.  This was by design.  I left each spindle a little long so that I could fine tune it later. I believe the easiest way to adjust the spindles is to do them one at a time.  I would slip one spindle into the headrest, then check to see how high the headrest was with respect to the back legs.  Then I would remove the spindle, cut off a small amount from the top, and check it again.  It usually only took a couple of tries to get it right.  Since I was contorting myself to see where the headrest holes were, I finally drew some witness marks at each hole to make the alignment easier.  Once each spindle was individually adjusted, I installed them all into the headrest.  With a single spindle in the headrest, it’s fairly easy to pull the headrest forward to align with the back legs, but with all 7 spindles installed, there is a lot of pressure when pulling everything forward.  To avoid breaking any more spindles, I filed the front of the seat holes to provide some relief.  Brock uses a reamer to do the same thing.  Once that was done, the spindles moved more easily and I was able to get the headrest installed (with no cracking noises!).


I now have a complete chair!!  It’s just not a rocking chair yet. 

The next step will be to sand, sand, and sand some more.  I will have to disassemble the chair, but once thoroughly sanded, it will be ready for glue up.  After that big step, I will do the final shaping and sanding of every joint.

Saturday, April 16, 2011

More Spindle Shaping


Sorry for the delay, but I’ve been on vacation.  I should now have more time to dedicate to my chair.  Today I was able to complete two more spindles.  I again used the angle grinder with a sanding attachment to round over the back.  Then I follow up with an orbital sander.  Then I hand shape the ends to round them to fit the seat and the headrest.  After I had shaped the seat end of the #2 spindle, I noticed that it leaned back quite a bit.  I stupidly pulled the spindle forward and then heard a loud “snap”.  Doh!  I should have spent some time shaping the bottom so that the spindle would move forward with just slight pressure.  Instead, I ended up with a big crack.  It appears to be along a knot, so the spindle may not have endured the life of the chair anyway.  I was not happy to have broken a part, but fortunately I had a spare.


I moved on and completed spindle #3, and then shaped another one that I labeled as #2.  The spindles are not in the headrest at this point.  They are simply taped to the back.  
Two down, two to go.   


Sunday, March 20, 2011

Arm and Spindle Shaping


I completed shaping of the arms yesterday.  I actually shaped the right arm last week.  The process turned out to be easier than I thought.  I spent a lot of time looking at pictures of Maloof and Brock arm shapes, as well as the arms from other builders.  Most appear to be different, so I was left to decide which design I wanted to use.  There are so many complex curves that I finally gave up trying to draw the design on the wood.  Instead, I just dove in and started shaping until I found a shape that looked and felt good.

Maloof and Brock both started shaping the arms by band sawing much of the material away.  This requires the wood to be held at dangerous angles (that both men recommend against).  Since I enjoy keeping all my digits, I decided to do my shaping using an angle grinder with 60 grit sandpaper.  I could have used my Holey Galahad disk, but I felt that would be too aggressive.  The grinder made quiet a mess of my shop, but hey, sawdust is all part of the fun!


The front leg joint was shaped to gently blend into the arm.  The microplane works great for this task.  I used the grinder starting vertically from the inside edge of the back, and then spiraled to horizontal as I moved the grinder forward. You can see the spiral in these pictures.


The arms are shaped with a hard line all the way around that blend into the hard lines in the back legs.  In shaping the back legs, some of the lines remain hard (sharp edged) while some blend into softer curves.  Determining where to use the hard and soft lines is a personal choice.  Again, I tried to follow the Maloof design where possible.  The arm/leg joints are only roughly blended together.  The final smoothing will happen after the parts are completely screwed and glued together.

After completing the arms, I moved onto the spindles.  These are not difficult to shape, but they are time consuming.  As Brock says in his video, you had better enjoy making the spindles because there are seven of them!  I was able to complete three yesterday.  I used the angle grinder to round the back of the spindles (the wide part). And then I used my random orbital sander to refine the shape.  Rounding of the spindles was done using the microplane to start.  Then I sanded.  I used the Veritas dowel makers at times, but not exclusively.  This is a tedious process of sanding, testing the fit, sanding some more, etc., etc.  It’s a great feeling when the parts finally snug into place.  Note that I maintain the spindle numbering using chalk so I don’t get them mixed up.  I did a test fit of the first spindle into the headrest, but this picture was taken with the spindles just behind the headrest.  Four more to go…